By Jerry Bradshaw President, Tarheel Canine Training, Inc
The .pdf version with images from K-9 Cop Magazine
Part 2 of 3 (part 1 here)
Introduction
In this second part of a three part series, we will tackle the out and return to heel. As I mentioned in the introduction in Part 1, officers often struggle with the out and return exercise. In this article, I will discuss a way to develop the out and return to heel out of an exercise we call a redirected bite. Redirected bites, by definition, are scenarios where the dog is sent to bite one suspect, and must be called out of the grip to be sent to another suspect. For example, suppose the dog is apprehending a fleeing suspect on a traffic stop and the officer gets into a close quarter scuffle with another suspect. The dog must be recalled to return immediately to assist the officer.
In the typical set up of the redirected bite, the handler and dog are in the middle of 2 decoys that are set up (generally passive and 180 degrees apart). The dog is sent to bite one decoy; the dog is then called out of the grip to return past the handler; and the dog is instructed to bite the second decoy. Once the dog is fluid with this very necessary skill, the dog will be asked to “stop at the handler” in heel position which will become the out and return.
The out and return is still mandatory in certain police dog certifications, with the dog being called out of the grip to return to the handler, rather than staying and guarding the suspect. Ultimately, I think every dog can, and should, learn both techniques for disengage because this allows the most flexibility in the deployment of the dog, and in maintaining good, clear outing fundamentals. Further, there is a synergistic effect of training both the out/guard and the out/ return and the inclusion of both techniques into the dog’s repertoire of behaviors will complement the fluidity of both skills.
Command Structure
The previous article in this series introduced training the out and guard. I like to start with that skill first before introducing the redirect and later, the out/return. The out and guard is easiest to teach and maintain. The out behavior is produced by consistent reward for the out with re-bites on the decoy the dog is guarding. This concept of giving something up to get something in return is huge in K-9 work. We use it in out training, redirect training, recall training, and equipment orientation training (see my article, “Focusing your Patrol Dog on Human Apprehension” Police K-9 Magazine March/ April 2008). Once we introduce the redirected bite, we will have two ways in which the dog can be disengaged from the grip on verbal command at a distance. The out and guard and the out and return must be distinguished on command. We want the dog to be able to drop into a guard on one command, “out” and come off the grip and return to the handler on another separate command. If we structure our commands properly, the dog shouldn’t experience any confusion as to what he should do. Here is how I structure these two separate disengage commands:
Out & Guard: “OUT”
Redirect (Out & Return): “Dog’s Name & Heel or Here”
I won’t get into the typical discussion over “stand still, stop fighting the dog, rover, out,” here, except to say that this is one of the most unnecessary and actually harmful training routines that has been passed down generation to generation in the K-9 field. It has absolutely no good use but to actually make outing more difficult for hard dogs and to produce anticipation for softer dogs. We do not give preparatory commands for the sit, down or stay. The dog only needs one word to execute a behavior. The idea that the dog “preps” for the out by hearing his name is a fiction. Virtually every dog that gets all the preparatory commands just fights the out harder because that string of words tells him, “I’m about to make you let go and then take your prize away.” There is absolutely no reason to give preparatory commands. Keep things simple, “out” means let go and stay with the decoy, and “Rover here” or “Rover heel” means come back to me. “Here” means my vicinity, “heel” means specifically to heel position. In the recall (call-off) exercise, I simply use the exact same command “Rover heel” before the dog gets on the bite. My dog’s name means come find me in any circumstance (open the door popper and say “Rover heel”). Simple, efficient, clear and easy to remember under stress. One command produces one action. If your SOP dictates to say all that prep command nonsense prior to you tactically removing your dog from a real bite, say it only then. If you use it in training, say those words when you are NOT going to out your dog, so he ignores them.
You only want him to listen for words that are meaningful to him in the moment he must execute a command. Otherwise they become part of the command structure and can interfere with optimal performance.
Prerequisites
The trainer should know ahead of time if the dog is normally easy or difficult to out. This should be sorted out in the out/guard training which should come first. Remember that the added confusion of a second decoy on the field may cause some problems with the out as the excitement will be at a high level. The goal is to have the second decoy motivate the dog to disengage the first decoy when the first decoy freezes up by excitedly agitating the dog with a whip or jug of rocks. Then we slowly eliminate the agitation to the point where the dog will recall from the grip on command and engage a second, passive decoy. Be ready for the dog to mistakenly continue to fight decoy #1 when he hears the agitation. This improperly directed aggression is normal. This is why the dog will be set up with a training collar to out the dog (the decoy can make the correction or another trainer can float into the scene and make the correction), and a second line on the dog affixed to the agitation collar to physically control the dog. See the picture demonstrating the set-up.
It is critical to be aware that while motivating the dog to come back to another grip through agitation is initially desirable, it can cause the dog to react only if he hears the agitation. This is a contextual cue that is inevitable, at least initially. We must wean the dog off this contextual cue to the desirable cue of the handler’s recall command “Rover heel”.
Training set-up
Step 1: Planning
As in all our training, planning ahead to make sure we get the outcome we desire is crucial to keeping the dog out of conflict. The equipment necessary will be as follows:
Long line (15’ or 30’ – when we progress to having the dog stop at the handler in the middle, I like to use a flexi-leash as demonstrated in the accompanying photos, but that comes after a number of sessions where the dog knows the redirect exercise well – initially we use the long line)
Flat collar or Fur Saver (long line attached to this collar).
4’ – 6’ leash preferably with no loop handle (drag leash).
Training collar (pinch collar) The short leash is attached to the outer ring of this collar.
E-collar after the behavior is clear to the dog. If you will eventually blend the E-collar into the exercise, allow the dog to just wear it through all the skill training of out/guard and out/return.
Two decoys set up 180 degrees apart. Both decoys should be equipped with a whip or jug of rocks to use for agitation to excite the dog’s prey drive. This exercise can initially be taught on decoys in sleeves and then moved to bite suit (targets can vary) and hidden sleeve, provided the targeting is good.
Whatever you do, the decoys need to be dressed similarly – two sleeves, two hidden sleeves, two suits initially. The dog will give something up to return to you if you give him something of equal or greater value. I like to use decoys of similar size and skills as dogs that enjoy combat will have a preference to work on the stronger decoy. Not all dogs create these preferences, but in order to not have an issue pop up, we must prepare in advance.
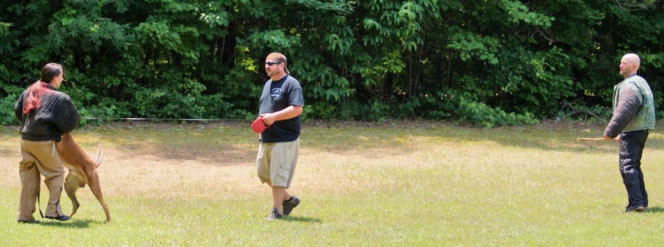
The handler will have the dog sit in heel position and face one of the decoys. If using two decoys in suits, I like to start with a grip on the bite suit in the triceps area to make the out as easy as possible, minimizing the confrontation and defensive mood of the dog. Over time, front bites are fine. The dog is sent to decoy #1 as the handler allows the line to slide through his hands. Decoy #1 works the dog, making sure to get the grip nice and full as we would normally do. Then this first decoy makes sure there is a clear line from the back of his arm down the long line from the dog’s collar to the handler’s hand before he starts to “freeze up” for the redirect. The handler must keep an eye on the line and manage it appropriately to keep it from tangling up. Always fix the line at the dog’s collar if it is fouled around his legs. As you approach the dog, praise him, pet him, and get him used to coming in and out on him as he works (as you normally would). Use line tension to set the grip and keep the dog from anticipating the release. The decoy must keep his feet moving, alternating between prey and defense (drives), setting the dog down to counter, allowing him to push so as to not signal the dog to release early as he starts to understand the game.
Step 2: Motivating the redirect
The goal in motivating the redirect is to trade out one decoy (frozen for the out) for a more exciting fight with another decoy (who comes alive when the dog releases and comes back). There is a very important progression to the redirect. After decoy #1 freezes up with the tab line attached to the training collar in his hand ready to correct, we are ready to redirect the dog. The sequence is as follows:
Decoy #1 freezes = handler commands: “Rover heel”
One of 2 things will happen. Either: (1) the dog lets go and comes to the agitating decoy #2 or (2) he stays in the grip on decoy #1. Normally the first few times the dog will stay in the grip because even if his out and guard are clear, he doesn’t understand this context for releasing on his name, so plan for that. If he stays on the grip after the handler says the dog’s name, the decoy must immediately correct the out (correction into the grip). As soon as the dog drops out of the grip and before he can come into a guard (what he already knows to do after the out), the handler must pop the long line on the flat collar as the second decoy agitates strongly to draw the dog away from decoy #1.
Three of the most common problems in the first few sessions are:
- The dog does not out and needs correction to do so.
- The dog outs but he reflexively guards decoy #1 despite all the commotion behind him.
- The dog outs and on the agitation re-engages decoy #1 (directing his aggression on the closest available target).
The suggestions in the above paragraph deal with each of these issues. It is the job of the handler and decoy to be aware of these likely outcomes and have a plan to deal with them. Decoy #1 must be in a position to correct the out by having the line in his hand and timing must be keen. Decoys should not just grab the line right before the out corrections either, as the dog will start releasing on that signal. Decoys should be comfortable touching the dog while he is gripping, so they can be sneaky as they are touching the dog, grasp the correction line and be ready to correct. In many of the seminars I teach, I see poor planning and poor communication between decoy and handler about how to deal with these issues “on the fly” when they are happening at full speed. I cannot stress enough that these issues must be worked out prior to sending the dog to the first grip. Talk about what you expect each decoy to do, especially if the decoys are not very experienced. Decoy #1 must catch the dog, grab the correction line and be ready to enforce the out when the handler or trainer signals the decoy to freeze up and the handler to do the redirect. The handler must be ready to give some motivating pops on the line to bring the dog out of a guard or keep the dog from returning to decoy #1 when the dog does let go. This means he must have the long line in hand and fouled around the dog or decoy so he is in a position to give a flat collar correction to turn the dog around. Decoy #2 must agitate at the right time. Too soon, and the dog will dig in harder on the grip he has, making the out more difficult and too late, and the dog will try to get back to the decoy he already had the fight with.
The handler not only must be ready to help the dog with the long line to make the redirect, but he must also give the dog the familiar signals of a tight line when the dog is correctly in the grip and a loose line just prior to the out. The line tension will help avoid anticipation of the redirect. I recommend doing the exercise initially in a school hallway on slippery floors to make the flat collar corrections easier to turn the dog around. This will become important when we turn the redirect eventually into the recall exercise and we have to stop the dog prior to the grip with little force. (See my book, Controlled Aggression for a discussion of line tension and the recall exercise).
Now, assuming we get the dog to come toward the second decoy, make sure to praise (or use verbal marker “yes” and then tell him to go bite decoy #2 with his bite command), give the grip on the back of the arm again, and set up for another redirect back to decoy #1. The procedure is exactly the same as discussed above every time you do a redirect. Once the dog begins to see the pattern of what is required, the likely outcome is that the dog may begin to anticipate the redirect after a few sessions. This is an ultimately undesirable outcome (anticipation). However, don’t panic if you see it, as it signals to us that the dog understands the exercise so well he knows what is next. Anticipation is learning. What we really want him to do, however, is to come off on command and not to anticipate the second bite. Therefore, we must take some steps to ensure this is the outcome we get.
There are a number of things we must now do to vary the context:
Decoys must keep the dog in the grip, adding some defense and keeping a lot of movement in the fight. Vary inside front bites with back shoulder bites and forearm bites (for police dogs). Throw in some distractions, such as stick or jug of rocks to keep the fight more intense. Decoys can put the dog on all four feet and touch the dog while he is in the bite…the tactile stimulation will keep the dog engaged.
Decoys must keep a hold on the short line, but not keep it tight and not allow the dog to leave him prior to the command. If the dog comes off the grip on his own, the decoy must not let the dog leave (using the line) and must immediately attack the dog to re-engage the grip. However, a good decoy will be able to read the anticipation in the dog’s grip before he comes out and make an adjustment accordingly. Leaving the grip is almost 100% of the time the fault of the decoy not keeping the dog engaged in the fight (remember, to a dog for whom outing is a new thing, he will cue some on the freeze up – this will be eliminated later).
Begin mixing in out and guards with reward bites for guarding, with the out and returns. Here the decoy must keep the dog from redirecting and correct the dog into a guard position so he can deliver a reward for the guard.
Once we add in out and guards, vary sessions where we don’t do any redirects, or more out/guard and remember that action commands (redirects) are more exciting than commands where the dog must restrain his drive (guarding). If you start this training as an imprint exercise with a young green dog, before the dog has an out/guard, say on sleeves you can slip the sleeve rather than, out/guard.
Be sure to vary direction and decoy placement throughout the process. For example, if you send the dog in one direction down the field and redirect him from that position all the time, he will anticipate based on direction (place on the field). I always make my decoys swap places on the field while the dog is in one grip. If you send the dog first on decoy “Bob” and always redirect him from Bob, he will anticipate the redirect based on the decoy he is biting. What I try to do is to randomize direction and decoy position on the field all the time.
Step 3: Enforcing the Redirect
At some point, you will want to incorporate a correction into the redirect. This is one instance where the handler will correct the dog from behind on the long line. Though this is not optimal for reasons discussed earlier, as long as the dog is clear on the “out” command, a correction from behind will serve as a reminder to come back on the “Rover heel” command.
Companion Video for Redirects: https://youtu.be/jLLYQF3p0Cc
Step 4: Incorporating the E-Collar into Enforcing Redirect
Once the dog responds to the long line correction for the redirect, the E-collar can be introduced ahead of the long line correction. We use the same pairing of corrections as before in the out training. The handler commands the dog to “Rover heel” and if the dog doesn’t instantly let go and return to the handler, the handler will nick the dog with the E-collar, and follow that with a jerk-and-release on the pinch (attached to the long line). Over time as the dog responds to the E-correction, and gets ahead of the long line correction, the longline correction can be eliminated.
Step 5: Finishing up the Out and Return
The main prerequisite for this part of the exercise is that the dog must know where heel position is. This doesn’t mean he just knows how to heel, but rather can find heel position from 180 degrees around the handler in an obedience context for a toy reward. If your dog is shaky on this, make sure he knows this before starting the out/ return exercise. The dog should be able to come up to heel position from behind, from in front and from off the left and right sides of the handler.
Once the dog is redirecting on command cleanly and coming back quickly, following the handler’s signal to go to the next decoy, we can incorporate a “stop” at the handler. The dog will be sent on decoy #1, and then be called to redirect (“Rover heel”) and as the dog comes back, call him into heel position. If the dog does not know heel position, you cannot expect the dog to come into a nice finish. You could just call him to you and down him. I prefer to get the dog to come to heel, briefly stay at your side and then reward the come to heel with a send for a grip on the second decoy.
The decoys will be passive on the redirect so the agitation doesn’t confuse the dog. I like to position myself (as in the picture using the flexi leash) with my back to the dog in the grip, so when he drops off the grip, he has a clear line to my heel side so all he has to do is run toward heel position and stop, as shown in the sequence of photos. Over time, I will change my body position to make him find heel position off the redirect all the way to coming to my heel side when I am facing the decoy he is leaving.
The exercise can then be made more realistic with 2 decoys hiding. Decoy #1 comes out and threatens, or he runs, and you sent the dog to grip decoy # 1. The dog has not seen decoy #2 in hiding. Once the dog is on decoy #1, the handler calls the redirect and calls the dog to heel position. Once in heel position, decoy #2 comes out to attack and the dog is sent to grip decoy #2. Once the return bite decoy (#2) becomes a hidden reward, we have perfected the out and return. Vary the time after the dog comes back to heel position and before sending him to the reward bite. Just like we vary the guard time in the out/guard exercise. Making the dog wait to get his reward bite, we make the dog come to heel position, heel around a bit and then be sent for his reward. In fact, recall him to heel off the first grip and then heel around for a minute before sending the dog for the second grip. In a certification trial, just continue heeling to the next exercise and your dog has done the out and return and will be rewarded with the next exercise because he has been taught impulse control and to wait for the reward. Make sure you praise him or if you use verbal markers, use them at first when he redirects (Rover heel -“yes!” – “stellen!”) Then when he comes into heel position (Rover heel – “yes” when he arrives in heel position. Then vary the time in heel before releasing him to another grip on the 2nd decoy with his bite command). When you go back to training after a certification trial, make the reward bite happen more quickly. Managing rewards in bite training is a key skill for any trainer and handler to master.
Step #6: Multiple Redirects
Obviously you can redirect the dog multiple times on two decoys on the field. You can also add in out and guards to help the dog discriminate between the verbal commands of out and return and out and guard. You will see after a while, the dog stays in the guard and doesn’t look at the second decoy when asked to out because he anticipates the re-bite reward for the out and guard, but when the dog hears the redirect command, he releases and turns away from the decoy quickly to run toward the handler. Make sure you set the dog up for success and do not move too quickly in the progression. If the decoy keeps the dog engaged properly, the anticipation will go away and the dog will perform on your command (either out/guard or out/return) rather than overthink and try to anticipate. Move to 3 decoys in a scenario, keep the dog paying attention to command and not context.
“ As in all our training, planning ahead to make sure we get the outcome we desire is crucial to keeping the dog out of conflict.”
Redirects are an important tool for real life deployments, as the possibility of an officer needing his K-9 to assist with multiple threat is a real one. Building the recall to heel out of the redirect will generate speed, precision and trust in the dog, as he knows his compliance is rewarded. The handler can start to substitute toy rewards upon occasion for the redirect and recall to heel if the dog will take a toy reward in the presence of a decoy. This is an exercise we work with advanced dogs called “decoy neutrality” where the dog learns through a process of successive approximation and systematic deconditioning to take toy rewards and be satisfied with them in the presence of decoys in close proximity. This allows the handler a lot of flexibility in rewarding the dog for out/recall in scenario training or when only one decoy may be available for training. Becoming fluid with both out/guard and out/return is important in my opinion to making a strong release behavior and preparing the dog for a proper tactical removal, which will be the subject of the last article in this series. It also sets the stage for making equipment orientation drills a breeze.
Trying to build this behavior through compulsion will result in a lifetime of struggle. What I said in the first article in this series bears repeating…it is the rewarding of the release that maintains this behavior. Corrections should be used only as the dog is learning to out fluidly. After that, you will maintain the ability to correct by setting up your training with that option always in reserve, but the rewarding of the out/guard and the out/return will build a lifetime of compliance.