By Jerry Bradshaw President, Tarheel Canine Training, Inc
The .pdf version with images from K-9 Cop Magazine
Part 3 of 3
The fi nal installment of this three part series regarding release techniques concerns the tactical release. Depending on where you are in the country this is sometimes called the “Tactical Removal,” or the “Hard Out.” The idea is that in a real street apprehension situation, you are not going to verbally out the dog from a distance in the vast majority of cases (unless the dog’s safety is at issue and you want the dog immediately off the bite and back to your position of cover). This is because most dogs are prey driven, and the normal human response to a dog bite is, once the dog lets go, to move their hand to cover the bite area or make a move away from the dog.
This prey movement will only reengage the dog. This is completely undesirable and can open your agency to liability if the dog reengages after the subject has complied, stopped fi ghting, and complied to being put in custody.
Further, there is an offi cer safety issue at work. Removing the pain compliance before the subject is in the control of arresting offi cers allows the subject opportunity to fl ee or fi ght your back up. And if the dog is called to release from a distance, he can potentially redirect on back up offi cers helping with the arrest, which will surely make your non K-9 back up offi cers wary of working with you.
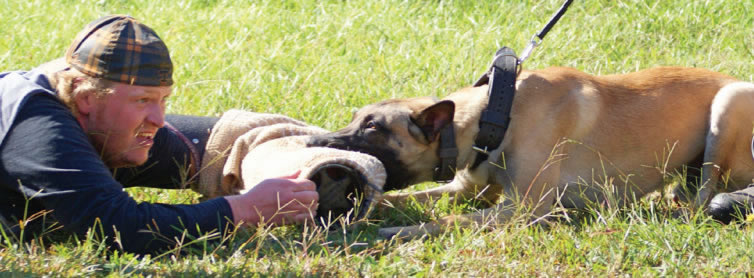
Instead, we teach the K-9 handler and back up to tactically approach the unsearched felony subject. The handler holsters any weapon, back up officers cover the subject and the rest of the arrest scene and ideally handle the handcuffing procedure as the handler initiates positive control of the dog by placing hands on the dog’s collar. The back up officer doing the handcuffing will call to the team “cuffs on” when the subject is in the control of the arrest team. The dog is then tactically removed and the handcuffing is completed.
The purpose of this positive control is to ensure that once the dog has released the grip, the dog cannot reengage on his own unless the handler makes the use of force decision to do so; i.e. the subject starts fighting with the arrest team and the handler decides further application of the K-9’s pain compliance ability is needed to subdue the fighting suspect. After the dog is removed, the apprehended subject will move some, verbally call out (which is an excitement to the dog) and the positive control keeps the suspect and the back up safe from any reengagement. The handler can simply walk the dog into the grip if further application of the K-9 is deemed necessary.
In the properly trained K-9, once hands are on the collar, an out command should be given to initiate the release of the dog. In many cases however, the dog is actually “choked off” the grip by gripping and squeezing the daily wear flat collar or by placing tension on the live ring of the fur saver or choke collar. The dog isn’t given an out command as much as simply forced to release. While this is always available as a back up failsafe to get the dog to release, proper training dictates the out should and can be a verbal one.
Preparation
Because dogs are contextual learners, when handlers approach their dogs in training to make them release, the dogs will anticipate this action and typically perform the “K-9 Spin”. Meaning the dog starts to spin away from the handler making it hard for the handler to actually initiate positive control. Because this occurs so often, we must be very careful in the dog’s training to make the dog completely neutral to the approach of the handler. This starts from the time the dog is a green dog. Make sure bitework is done with a leash (15 foot is what we use) and a collar every time, so back-tension or opposition reflex can be initiated. The days of walking onto a soccer field, telling the dog to sit and stay, removing the leash and sending the dog on a fleeing decoy in a bite suit are OVER! Controlled aggression must be performed in scenarios and mini scenarios (compartmentalized training is discussed in a series of articles I wrote for K-9 Cop Magazine last year) that mimic how you will deploy on the street, but training must include elements that stress fundamentals as well. In training, you are constantly switching back and forth between deployment procedures and training fundamentals (grip, neutrality to approach) that may require equipment not used in a deployment.
“The days of walking onto a soccer field, telling the dog to sit and stay, removing the leash and sending the dog on a fleeing decoy in a bite suit are OVER!”
This tension during gripping helps build a calm (tension keeps the dog from moving on the grip side to side), hard (jaw muscles are exercised isometrically) and full (as the dog feels tension he works to maintain a full grip; a hard pull can make him feel like he might lose the grip, and thus when the handler puts a momentary amount of slack in the leash the dog will counter) grip. Further discussion and a more complete explanation of grip building is contained in my book Controlled Aggression. The handler during training will walk up the leash during the bite, touch the dog’s collar, lift up on it, release it again, pet and touch the dog, push his head into the grip, and generally be a part of the fight with the man. Back up officers during training can approach the dog on the grip, back away, approach and go hands on the decoy, assist him to the ground and back on his feet, and becomes a part of the arrest technique to which the dog becomes neutral. The handler does these approaches and retreats up and down the line often, so the dog becomes neutral to the approach of the handler. Needless to say, the dog must be allowed to stay on the bite for a while so these approaches and retreats can be practiced. Outs/guards, as discussed in the first article in this series, should be done not only with the handler up on the dog, but at distances, close, medium and far from the dog so approach is not associated with releasing, but rather praise, touching and assisting to subdue the subject is associated with handler approach. This should cut down on or virtually eliminate the spinning. In my classes I teach the 10-1 rule. For every one time you will ask your dog to release from heel position or perform a tactical removal, your dog should see 10 close approaches to him on the bite in all manner of positions (on the ground, standing, sitting, moving, still, with and without back up officers doing the same). This will allow the dog to “disconnect’ the release from your approach. In the case of the tactical removal, it necessitates the positive control of hands on the collar, and this is why, on these approaches, the handler must touch and hold the collar for varying amounts of time while the dog is biting without releasing the dog or choking him off.
Performing the Tactical Removal
Always remember that a dog has an opposition reflex. This means that any tension on the collar, from the leash or hands on the collar, will result in the dog biting down harder. This is why when you put a harness on a dog and pull tight, they will pull into the harness. In many seminars, I see handlers tighten the leash at the moment they try to out the dog. All this does is cause the dog to grip in harder and fight the release through habit (much of the habit is created in Europe because virtually all dogs from Europe, whether started in a KNPV, IPO or Ring program, were likely introduced to bitework on a back-tie and biting on a tight line in prey).
A proper tactical removal is not a choke off. It should happen like this: Handler approaches the dog, subject goes passive or maintains a negligible amount of movement. The collar is held in both hands with the handler straddling the dog to keep him from spinning left or right. There should be no direct tension or lifting of the dog off the ground (this will create opposition reflex) but hands are securely on the collar. The out command (verbal) is given, and when the dog releases he is backed straight back away from the subject, ready to be put back on the grip should the arrest go bad.
Training the Tactical Removal
In order to perform this action, the dog must have a very clean out and guard, as discussed in the first article in this series. Outs must be varied with handler position – sometimes the handler is close to the dog sometimes not. Start by doing occasional out and guards from heel position with your hand just lightly touching the dog’s shoulder and work your way to asking for the out with a hand on the collar but not grabbing it yet. This is a training principle called successive approximation. We are getting closer and closer through baby steps to where the dog will tolerate touching and perform a command. Dogs are very tactile. If you doubt it, go out into the yard with your dog, put your hand flat on his head or caress his ear, and tell him to sit. The touching can completely distract the dog from a very familiar obedience command. This is why we must do these successive approximations. Over time, the dog will become conditioned to listening to the out while feeling touching and light collar manipulation.
In your non-out situations, work your way to where the dog is completely used to having the collar grabbed. When you have done a lot of 10-1 approaches and the dog will tolerate hands touching him and releasing, try a tactical removal with one hand holding the collar. Be ready to enforce the release and immediately give a reward bite.
When the dog is outed in this manner, do not just take the grip away. Just like in the out and guard procedure from the first article, if he releases, he must be rewarded with another grip even if you had to enforce the out! Make sure you have his leash and pinch collar on and correct the dog, as in the procedure I outlined in the first article in this series, into the grip (you can have the decoy perform the correction if needed). Every time in training when he releases with hands on the collar, use a variable reward schedule to reward the release behavior. Sometimes make him out and give it right back to him, sometimes wait a few seconds, and sometimes make him wait longer, but always in training you must reward that release. Remember though, for every one release with hands on the collar, you must make 10 approaches without a release – where the handler is touching the collar, putting tension on it, grabbing it as if you are going to do a tactical removal, but then let the dog continue biting. Walk in and out on the leash.
This must become a staple of how you do your bitework every session. Involve other handlers during in service training to act as back ups who approach him on the grip and back out, all the while the handler keeps a tight line to ensure the dog doesn’t re-direct his aggression to the back ups. Back ups can be vocal, but start with low volume talking and condition the dog to hearing back ups give the subject commands that are NOT relevant to the dog such as “let me see hands,” and “stop fighting the dog.” This gets the dog much needed neutralization to back up and gets the other handlers involved in in service training when their dogs are in the car. The arrest procedure complete with handcuffing, and back up approach and tactical removals, should be practiced regularly as a part of training.
The process to teach the proper tactical release will take some time and should be implemented as a part of your training as soon as your dog’s release work is complete (out/ guard, out/return). Making it so that you don’t have to choke him out and stress his neck and trachea will add time to your dog’s service life, will surely make a real apprehension go more smoothly through the process of handcuffing and arrest, and keep your back up safe and confident when assisting you.