
By Jerry Bradshaw, Tarheel Canine Training, Inc.
The .pdf version with full images from K-9 Cop Magazine
Photos by Britney Pelletier / Product Photos Courtesy of elite k-9 www.elitek9.com
Many trainers do developmental bite work with a dog on a back-tie, such as prey drive development and defense drive development. The back-tie as a training tool, however, offers a number of advantages that go beyond just developmental work. Primarily it allows the trainer to set up training exercises where the dog is not allowed to make a mistake so that we can concentrate on rewarding and building good habits, rather than just focusing on correcting the dog for what we don’t want him to do.
In the basic back-tie set up, we stake the dog out on a 2” flat leather collar, or agitation harness. The back-tie line should be a sturdy tubular nylon line with a brass snap, and the line tied up high in the back post. We put the line up high in order to keep it from tangling in the dog’s legs. The line on the pole should be about 4-6 feet long, and no more. Be sure the snaps are strong. Use quality brass snaps, rather than nickel plated snaps. The line should be a 1” tubular nylon, or a light metal chain. Affix the line to the dog’s harness or collar. It is important to walk the dog out to near the end of the back tie so when the dog reacts to the decoy he does not slam into the end of the line and correct himself.
When the handler posts the dog from behind, rather than using the back-tie, it can create a handler dependency. Over time the dog expects the handler to always be behind him, and come to depend on this security. We want an independent dog, where he is neutral to the handler moving to different positions in space around the dog, and giving encouragement or enforceable commands from a variety of positions. Remember, dogs are contextual learners, and if the dog is used to you only being in one position around him, he may not react reliably to your commands when you are, in the dog’s mind, “out of position.”
If your dog has trouble barking make sure that your collar is wide and thick enough to distribute the dog’s weight into the line. Some dogs pull quite hard into the line, and these dogs should be fitted with an agitation harness that has a wide and padded breast plate to place the force onto the pulling dog’s chest and off his neck to allow better barking. Many dogs with trouble barking in protection have this trouble because of the force on their trachea from pulling into a collar, and switching to the right equipment can quickly solve the problem.

Using the Back-Tie for Grip and Strike Development
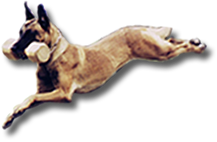
The back-tie set up is important because it allows us many freedoms in working the dog. Foremost, it allows the decoy to work without worrying about the quality of the handler. The decoy knows exactly how far the dog can come out to the end of the back-tie line, so that he can give him the type of grip opportunity he wants, whether it is full, or a partial grip, depending on the purpose of the exercise. If we want the dog to experience a big full grip, we can frustrate the dog by creating close misses, and then stepping through the half-circle very deliberately to allow a hard strike and the dog the best opportunity to fill his mouth upon impacting the sleeve. Once on the grip, the decoy can pull hard against the back tie to set the grip, before rewarding the dog with the sleeve.
Sometimes if we are teaching the dog to adjust to a full grip, we can deliberately offer the dog a partial (unsatisfying) grip of a quarter or a half grip, put immediate tension against the back-tie, and then quickly set the dog down and make the line slack, to allow the dog to adjust into a more satisfying (fuller) grip.
STRIKE
If your dog doesn’t come fast enough to the grip or drive through the decoy on runaway or even courage test bites, the back-tie offers another solution, by replacing the nylon back tie line with a bungee line. The bungee is an elastic line, and they come in a variety of elasticities, some are light and some very tense. The strength of the bungee should be matched to the dog’s size and strength, and allow for progression. As the dog gets more powerful pulling against the bungee, you may need to get a less elastic line to keep the improvement in speed and strike. The decoy will set up the bungee line low on the back tie post, so that as the dog runs and jumps there is a smooth, constant pull against the tension of the line.
BUNGEE LINE
The concept is simple. If you provide progressive resistance (the closer the dog gets to the decoy the more resistance the dog feels) the dog will adjust by running harder and faster into the line as he gets closer to the decoy. When the resistance is removed after a while, the dog will be conditioned to running faster and more powerfully the closer he gets to the decoy. This translates into a harder strike into the decoy. In my experience you will see pretty quick progress, but don’t remove the resistance too quickly. This is a conditioning process and the behavior can extinct if you quit the resistance too soon. You can also increase the elasticity by changing to a less elastic bungee to provide more resistance during training and faster entries. Every once in a while, in the middle of a session of 4-5 sends for bites, remove the bungee and see the results, but go back to using the bungee. This process over a period of months of practice will improve your dog’s entry significantly. The bungee line also teaches the dog to bite and hold firmly, because if he doesn’t, he is pulled backwards off the sleeve.
Training the out on the back-tie
Out training is another place to employ the back tie. The dog is back tied on the pole for the out, even though at this point he has probably been doing a significant amount of field work. The back tie will allow us to completely control his behavior, during and after the out. The 2 line out system shown allows us to keep the dog clean after the out, as well as to guard against any other behaviors we do not want to see (spinning, leg biting, etc). Once we add in the guard after the out, the 2-line system easily enforces the guarding behavior. For a detailed explanation of all the training steps in out training please refer to my book, “Controlled Aggression”. Here we will hit on a few of the key points.
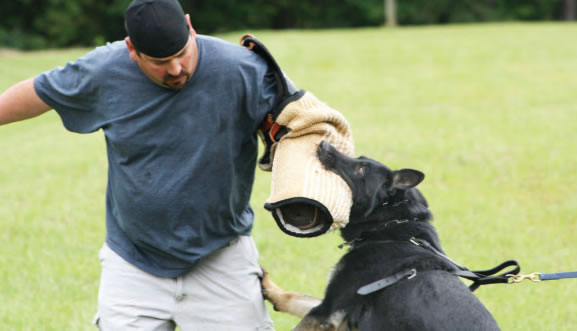
The dog should be back-tied in a flat agitation collar or on a harness, and a prong collar with a long line attached. The prong collar should be positioned high on the neck with the rings at the bottom of his neck. With the prong set up this way you have 2 ways to correct the dog: Jerkand-release style (positive punishment) or steady pull to effect a choke-out (negative reinforcement). Most dogs will come off with a good correction, but some harder dogs may need a more compelling reason to release. If the long line is attached to the prong collar’s outside ring, the chain with the inside ring will lie across his trachea, and a steady pull on the prong collar will tighten the chain and have the effect of a choke collar when pulled tight. I do not recommend using a choke collar unless you have a sensitive dog and you only need light positive punishment to encourage a release. The prong collar offers more versatility in this training, and is safer and more effective in communicating a correction.
The long line will be attached to the dog’s prong, and the trainer who will be giving the correction will stand behind the decoy. The reason for this set-up is to be able to correct the dog into the sleeve, not correct him from behind. Dogs possess two reflexes that are at work during out training. The opposition reflex, activated when you pull against the dog (say, as on a leash), makes the dog pull away from the pressure. This occurs when you pull on something in his mouth, he will try to pull against you. The gag reflex is activated when you push something into the dog’s mouth, the dog will gag and open his mouth. American police dog trainers are famous for correcting the dog from behind on a choke collar to get the dog to release. There is a big problem with this approach. In Europe, leash tension from behind while the dog is biting is meant to induce opposition reflex, causing the dog to bite down harder on the sleeve or suit. Thus correcting the dog from behind actually will induce the dog into conflict between biting harder and letting go, leading to slow outs, and ripping and tearing of the suit or sleeve cover during outs. Correcting the dog into the bite will induce more of a gag reflex, and turn off the opposition reflex, allowing for easier and cleaner outs.
Correction & Reward Structure
Out training should be done initially on a sleeve, even if the dog is already biting the suit and doing hidden sleeve bites as well. The sleeve makes it easy to reward the dog. Once the dog is clear with the out on a sleeve, and then the dog can be moved to the hidden sleeve and the suit (in all the various targeting areas), starting with the forearm, and moving to the triceps, and then the frontal biceps area.
The basic correction and reward structure is this: The dog is allowed to bite, and the handler commands “out.” The dog does not out, because he doesn’t likely know what out means, and so the dog is corrected for continuing to bite with a jerk-and-release correction into the sleeve. This is done by a 3rd party or by the handler, depending on how many people you have available to you during training. The dog lets go of the sleeve, and is immediately rewarded for letting go with another bite. In the initial stages of training we just want the dog to let go. Once out, the dog is immediately rewarded with another grip. After the dog gets the idea, we will make it mandatory for the dog to go into his trained guarding position after the out, and prior to another reward bite.
The back tie with the 2 lines employed allows us to instantly correct the dog for the out, and maintain a clean out into the guard position until the decoy rewards the release with another grip. The 2 line system allows the trainer to keep the dog from anticipating the reward, or taking a dirty bite, and allows us to enforce the guard position correctly (whether that is barking, sitting or downing after the release). The trainer can also easily set up back-ties in different places around the training area to keep the dog on the out program while working on other important skills. The handler can also move around the dog and out him from different positions while maintaining the enforcement of the out behavior.
Here is an example of how to weave the back-tie into other training. Suppose you are practicing a building search with a young dog that is still being trained to release reliably. The dog is sent into a building to find a suspect hiding behind a door. The dog wears his flat collar and the prong collar above that. The dog can be searching off leash if you wish. The dog searches and locates said subject (decoy) and after some barking the decoy opens the door and rewards the alert with a bite. The handler has already set up a back-tie line in the room where the decoy was hiding, so while the dog is on the grip, the dog is walked over clipped to the back tie, and another leash is clipped onto the dog’s training collar. You now have an Instant set-up for properly training the out.
Many handlers abandon the back-tie line or 2 line system for the out before the behavior is fully generalized, and moving the back-ties around to different places allows for the dog to become conditioned to release in a variety of environments. If you only do back-tie outs on your training field in the same place, and allow the dog to get away with slow or non-outing in scenarios such as this, the dog will learn contextually where he can get over on you and where he must comply. Do not create this kind of selective disobedience through faulty training set ups!
Handcuffing & The Back Tie
One of the mistakes often seen in certification is a dog that outs and is told to stay during a frisk exercise, but the dog then breaks the stay to come bite the decoy. Teaching a reliable stay during a frisk and handcuff is easily taught using the back tie, and then generalized with moving the back ties to different environments as in the above example. In the picture shown, the dog is in heel position with a decoy in front of him. The handler can give commands to the decoy (suspect) for getting into the preferred position for handcuffing. The handler can give commands to the decoy, all the while maintaining the dog’s calmness and enforcing the stay position, without the chance that the dog will take a sneaky bite when the handler is paying attention to the suspect’s behavior (and not to the dog) and break his stay. The handler can practice keeping his eyes off the dog, and his weapon on the subject, and a 3rd party trainer can keep the dog in the position of the stay. The dog is rewarded for his stay behavior, by the decoy going to the dog, pausing, and giving a reward bite while the dog is in the stay position on a variable basis (once in a while) to reward the dog for holding position. Using the technique where the decoy comes to the dog in a stay will teach the dog to patiently wait for the decoy to come to him, and these are the only bite rewards allowed. Getting dirty is never encouraged.
SUMMARY
The back tie is a very useful training set up that is easily employed, can be portable in a variety of different situations and training scenarios, and only takes a minute or two to set up in advance. Handlers that have few people to work with in training can use the back tie to great advantage, as it virtually creates another handler during patrol training, whether you are teaching the out skills, or stays during handcuffing procedures as examined in this article. Think of how many other places you might use the back-tie to improve your training results. It can be used in obedience with a 2 line system when developing changes of position where a back tied dog cannot break and come to you. It can assist in developing distance on stays. The back tie can be a useful tool in both shaping and enforcing many trained behaviors for the police K-9.